> ## Documentation Index
> Fetch the complete documentation index at: https://help.flowforth.co/llms.txt
> Use this file to discover all available pages before exploring further.
# Block Settings
> Customize the appearance of individual blocks with backgrounds, spacing, borders, and rounded corners — and control who receives each block.
Every block in the email editor has its own settings, separate from the email-level styles set in the [Styles panel](/emails/email-styles). This lets you customize individual blocks without affecting the rest of your email.
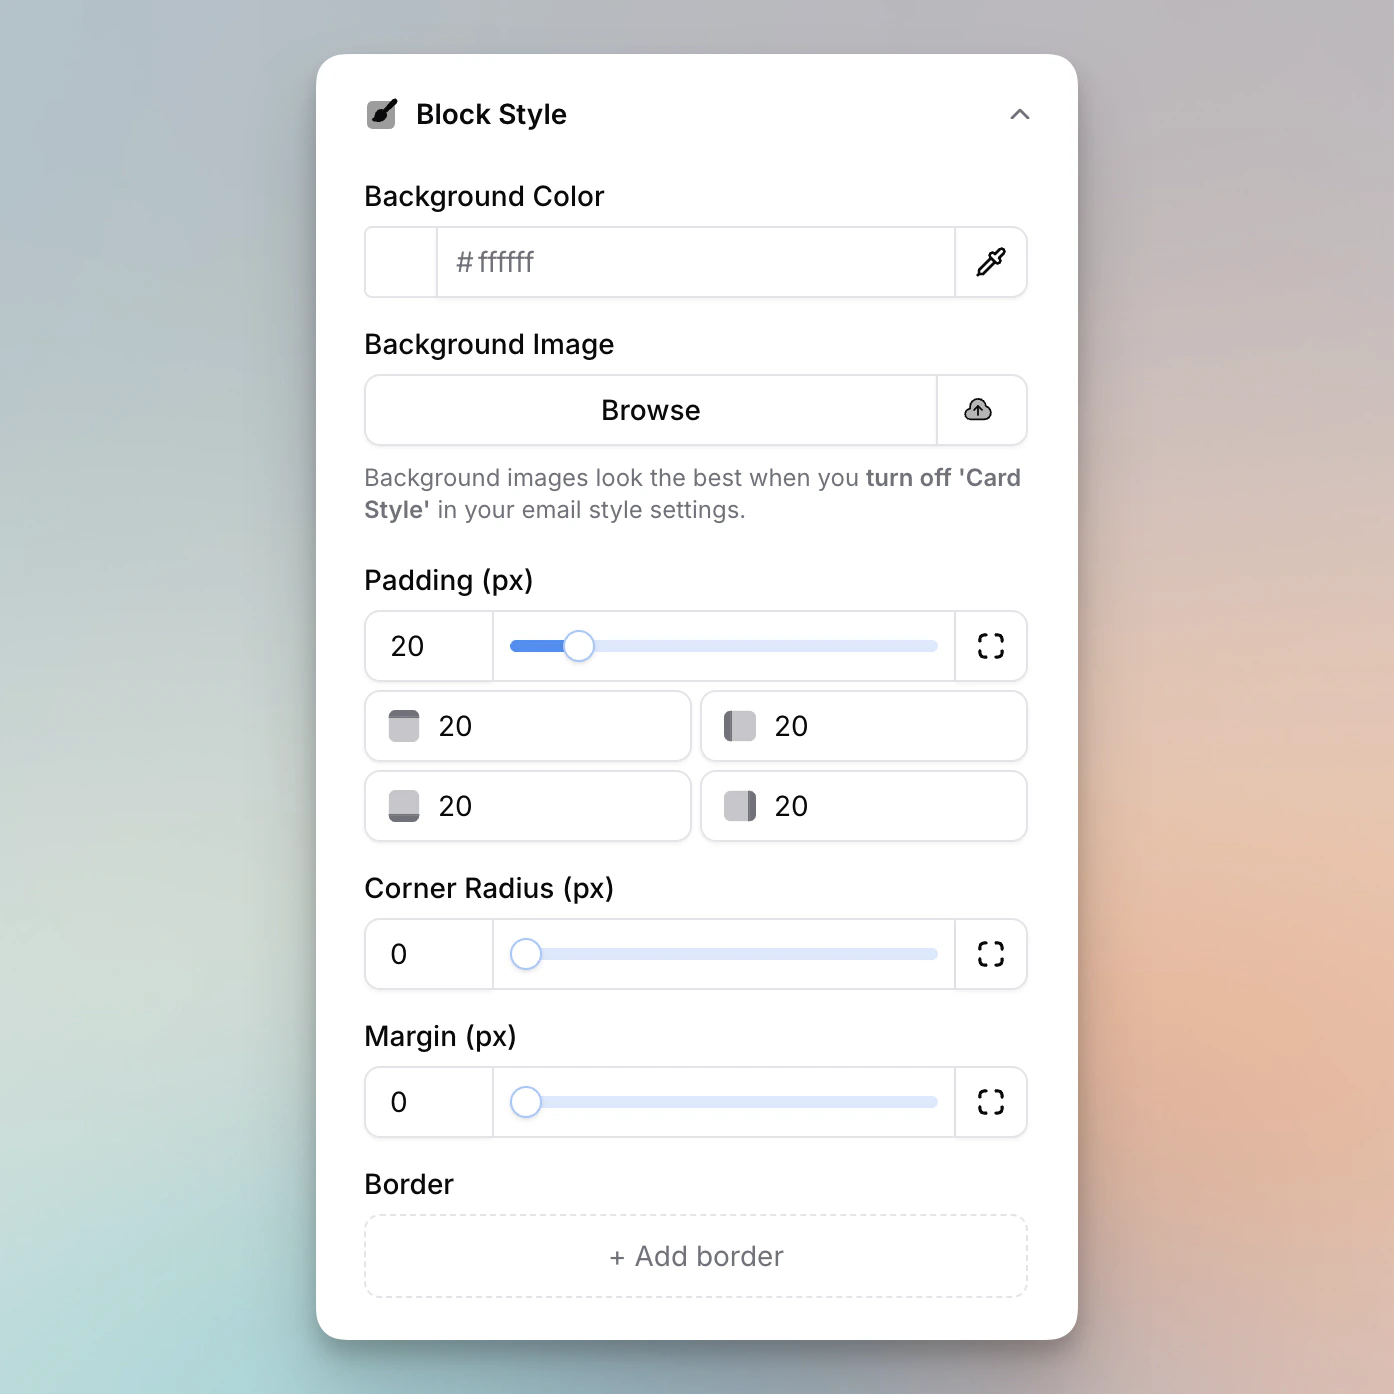
To access block settings, select a block and click **Block Settings** in the sidebar.
 ***
## Background Color
Set a custom background color for the block. This color appears behind the block's content and is independent of the email's overall background color.
***
## Background Image
Add a background image behind the block's content.
* Choose an image from your asset library.
* Set the image position: **top**, **center**, or **bottom** alignment.
Background images work best when card style is turned off in [Email Styles](/emails/email-styles). For a background image that spans multiple blocks, use a [1-column layout](/emails/editor/columns-and-layouts) and apply the background to the column.
***
## Padding
Control the space inside the block, between the block's edge and its content. Use the slider to set a uniform value on all sides. Click the **expand icon** to the right of the slider to set each side individually (top, right, bottom, left).
For edge-to-edge images, set padding to 0 in the block settings.
***
## Corner Radius
Round the corners of a block. Use the slider to set a uniform radius for all four corners. Click the **expand icon** to configure each corner independently (top-left, top-right, bottom-right, bottom-left).
***
## Margin
Control the space outside the block. Use the slider to set a uniform value, or click the **expand icon** to set each side individually.
***
## Borders
Add borders to any block. Choose a border color and set the width using the slider. Click the **expand icon** to set a different width for each side (top, right, bottom, left), which is useful for effects like a thick bottom border or an accent line on one edge.
***
## Background Color
Set a custom background color for the block. This color appears behind the block's content and is independent of the email's overall background color.
***
## Background Image
Add a background image behind the block's content.
* Choose an image from your asset library.
* Set the image position: **top**, **center**, or **bottom** alignment.
Background images work best when card style is turned off in [Email Styles](/emails/email-styles). For a background image that spans multiple blocks, use a [1-column layout](/emails/editor/columns-and-layouts) and apply the background to the column.
***
## Padding
Control the space inside the block, between the block's edge and its content. Use the slider to set a uniform value on all sides. Click the **expand icon** to the right of the slider to set each side individually (top, right, bottom, left).
For edge-to-edge images, set padding to 0 in the block settings.
***
## Corner Radius
Round the corners of a block. Use the slider to set a uniform radius for all four corners. Click the **expand icon** to configure each corner independently (top-left, top-right, bottom-right, bottom-left).
***
## Margin
Control the space outside the block. Use the slider to set a uniform value, or click the **expand icon** to set each side individually.
***
## Borders
Add borders to any block. Choose a border color and set the width using the slider. Click the **expand icon** to set a different width for each side (top, right, bottom, left), which is useful for effects like a thick bottom border or an accent line on one edge.
 ***
## Visibility
Limit a block to people on — or not on — a specific Planning Center list. In **Block Settings**, click **+ Add visibility condition**, choose whether recipients must be **on the list** or **not on the list**, and pick a list.
When the email is sent, only recipients who match the condition get the block; everyone else gets a version of the email without it. The content is removed from their email entirely — not hidden with CSS — so it never appears in their inbox or their view-in-browser page.
* **On the list** sends the block only to people on the list — for example, an update just for volunteers.
* **Not on the list** sends the block only to people who aren't on the list — for example, a sign-up pitch hidden from people who already signed up.
* Blocks with a visibility condition show a small filter badge on the canvas and next to the Block Settings title.
* To apply a condition to several blocks at once, select multiple blocks (shift-click or cmd/ctrl-click) and use **Add Visibility Condition** in the sidebar.
* Recipients are matched by their Planning Center person. Recipients imported from a CSV aren't on any list, so blocks limited to a list are removed for them, and blocks hidden from a list are included. When you send a conditional-block email to a CSV audience, we'll warn you about this on the send confirmation.
* Public email archives and RSS feeds show the email as someone on none of the lists would receive it: content limited to a list is never published publicly, while content hidden from a list is included.
* Moving a block into a column layout removes its visibility condition (conditions only work on top-level blocks) — you'll see a warning when this happens.
The editor preview and test sends always show the full email with every block included.
***
## Tips
* Combine a background image with padding to create breathing room around your content.
* Use corner radius on image or card blocks to create a softer, rounded look.
* Margin is helpful for creating visual separation between blocks without adjusting the block gap in your column layout.
***
## Visibility
Limit a block to people on — or not on — a specific Planning Center list. In **Block Settings**, click **+ Add visibility condition**, choose whether recipients must be **on the list** or **not on the list**, and pick a list.
When the email is sent, only recipients who match the condition get the block; everyone else gets a version of the email without it. The content is removed from their email entirely — not hidden with CSS — so it never appears in their inbox or their view-in-browser page.
* **On the list** sends the block only to people on the list — for example, an update just for volunteers.
* **Not on the list** sends the block only to people who aren't on the list — for example, a sign-up pitch hidden from people who already signed up.
* Blocks with a visibility condition show a small filter badge on the canvas and next to the Block Settings title.
* To apply a condition to several blocks at once, select multiple blocks (shift-click or cmd/ctrl-click) and use **Add Visibility Condition** in the sidebar.
* Recipients are matched by their Planning Center person. Recipients imported from a CSV aren't on any list, so blocks limited to a list are removed for them, and blocks hidden from a list are included. When you send a conditional-block email to a CSV audience, we'll warn you about this on the send confirmation.
* Public email archives and RSS feeds show the email as someone on none of the lists would receive it: content limited to a list is never published publicly, while content hidden from a list is included.
* Moving a block into a column layout removes its visibility condition (conditions only work on top-level blocks) — you'll see a warning when this happens.
The editor preview and test sends always show the full email with every block included.
***
## Tips
* Combine a background image with padding to create breathing room around your content.
* Use corner radius on image or card blocks to create a softer, rounded look.
* Margin is helpful for creating visual separation between blocks without adjusting the block gap in your column layout.