> ## Documentation Index
> Fetch the complete documentation index at: https://help.flowforth.co/llms.txt
> Use this file to discover all available pages before exploring further.
# Creating and Sending Emails
> Design, customize, and send beautifully styled emails through Flowforth with flexible templates, styling, and scheduling options.
Flowforth makes it easy to design and send customized, on-brand emails to the right people using your Planning Center lists and individual recipients. Here’s how to create and manage an email from start to finish.
***
## How to Create an Email
You can start a new email in two ways:
* Go to **Emails** and click **New Email**
* Or click **Create New** in the sidebar and select **Email**
Enter a **subject** (you can change it later), and you’ll be taken to the email editor with the **New Email** popup open.
***
## Choosing a Starting Point
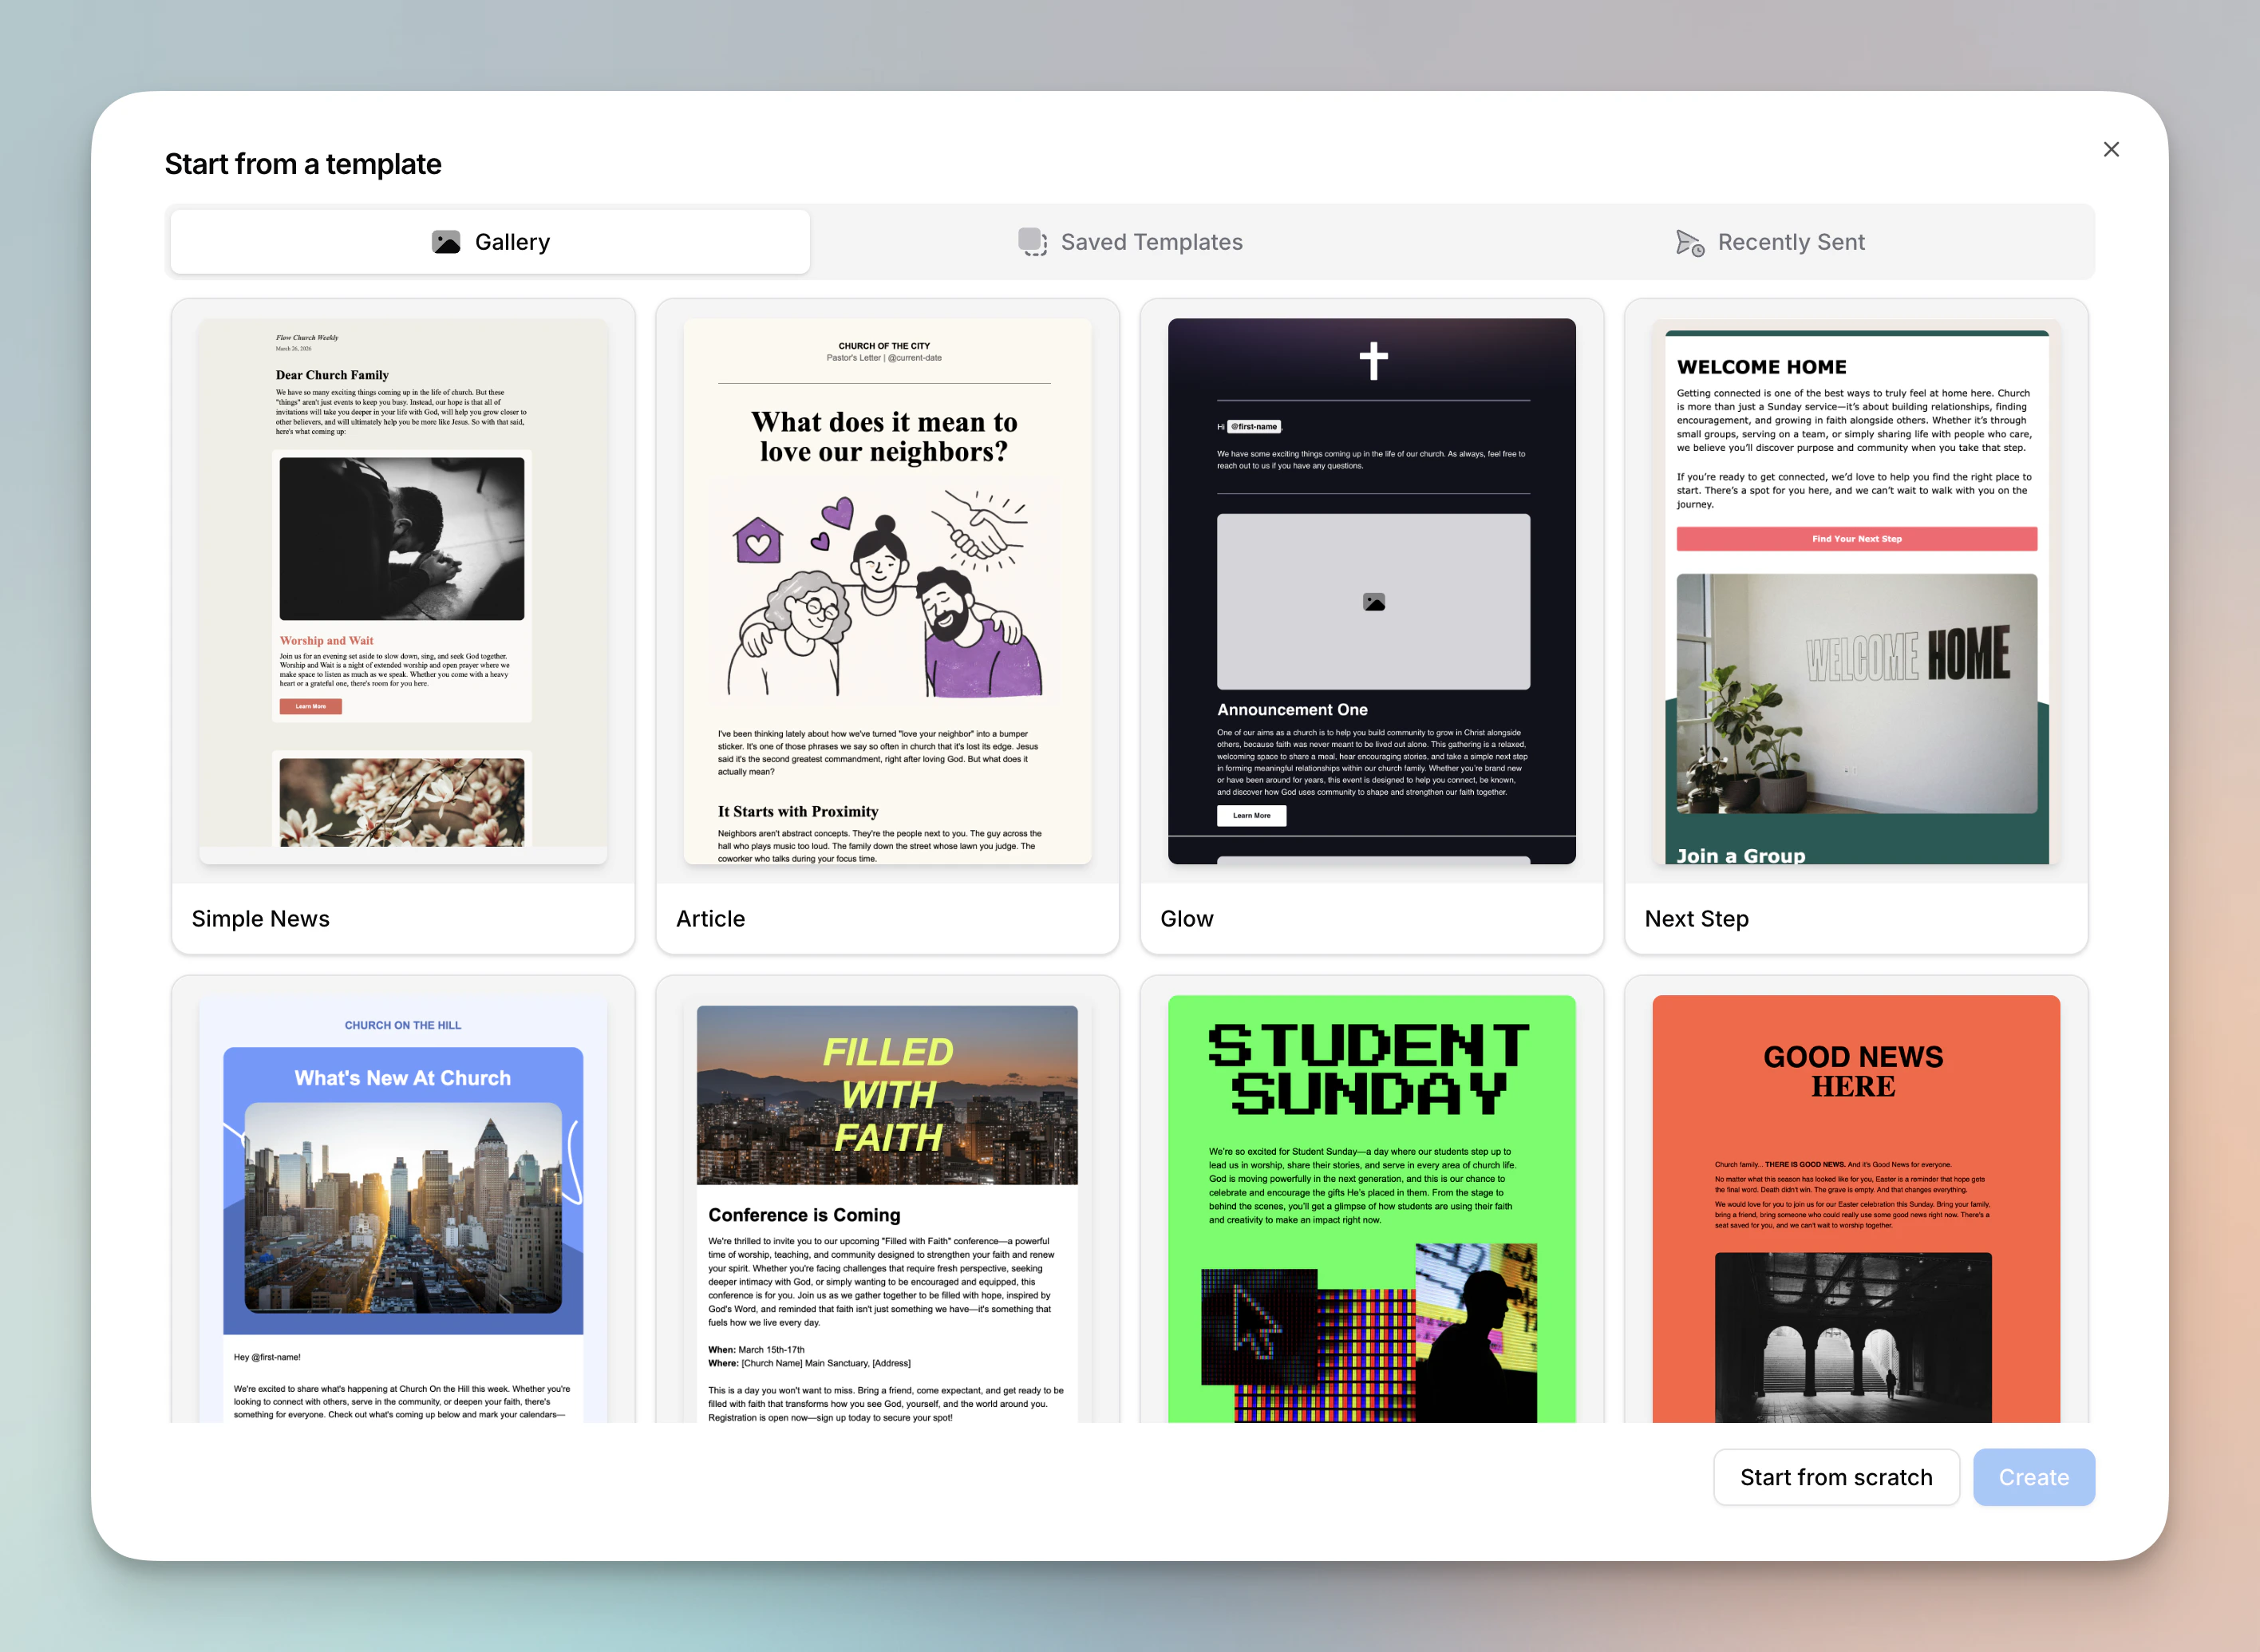
The template picker has three tabs:
1. **Gallery** - Browse a collection of pre-designed templates to get started quickly
2. **Saved Templates** - Apply one of your saved templates
3. **Recently Sent** - Start from the content or style of a recently sent email
You can also click **Start from scratch** at the bottom to begin with a blank email.
***
## Designing Your Email
### Adding and Editing Blocks
* Drag blocks from the left sidebar into the email canvas
* Reorder blocks by dragging them within the canvas or using the **arrow buttons** to the right of the block
* Click a block to edit it in the sidebar (or edit text directly in the block)
* Use the formatting toolbar above the canvas for text formatting on text blocks
### Duplicate or Delete a Block
* Click the block, then use the **duplicate** or **trash** icons to the right of the block or use the same options at the bottom of the sidebar.
***
## Editing the Footer
* Click on the footer or select **Footer** in the sidebar
* Edit the content, social links, and layout
* Click the **refresh icon** to reset to your default footer
* Click the **save icon** to save this version as your new default footer
***
## Editing Email Style
Click on **Styles** in the sidebar to customize general appearance, text defaults, button defaults, divider defaults, image defaults, and more.
For a full guide on all style options, see [Email Styles](/emails/email-styles).
***
## Setting Email Details
Go to the email's detail page by clicking "Save and Exit" if you're in the editor or by clicking on the email in the Emails table.
### TO
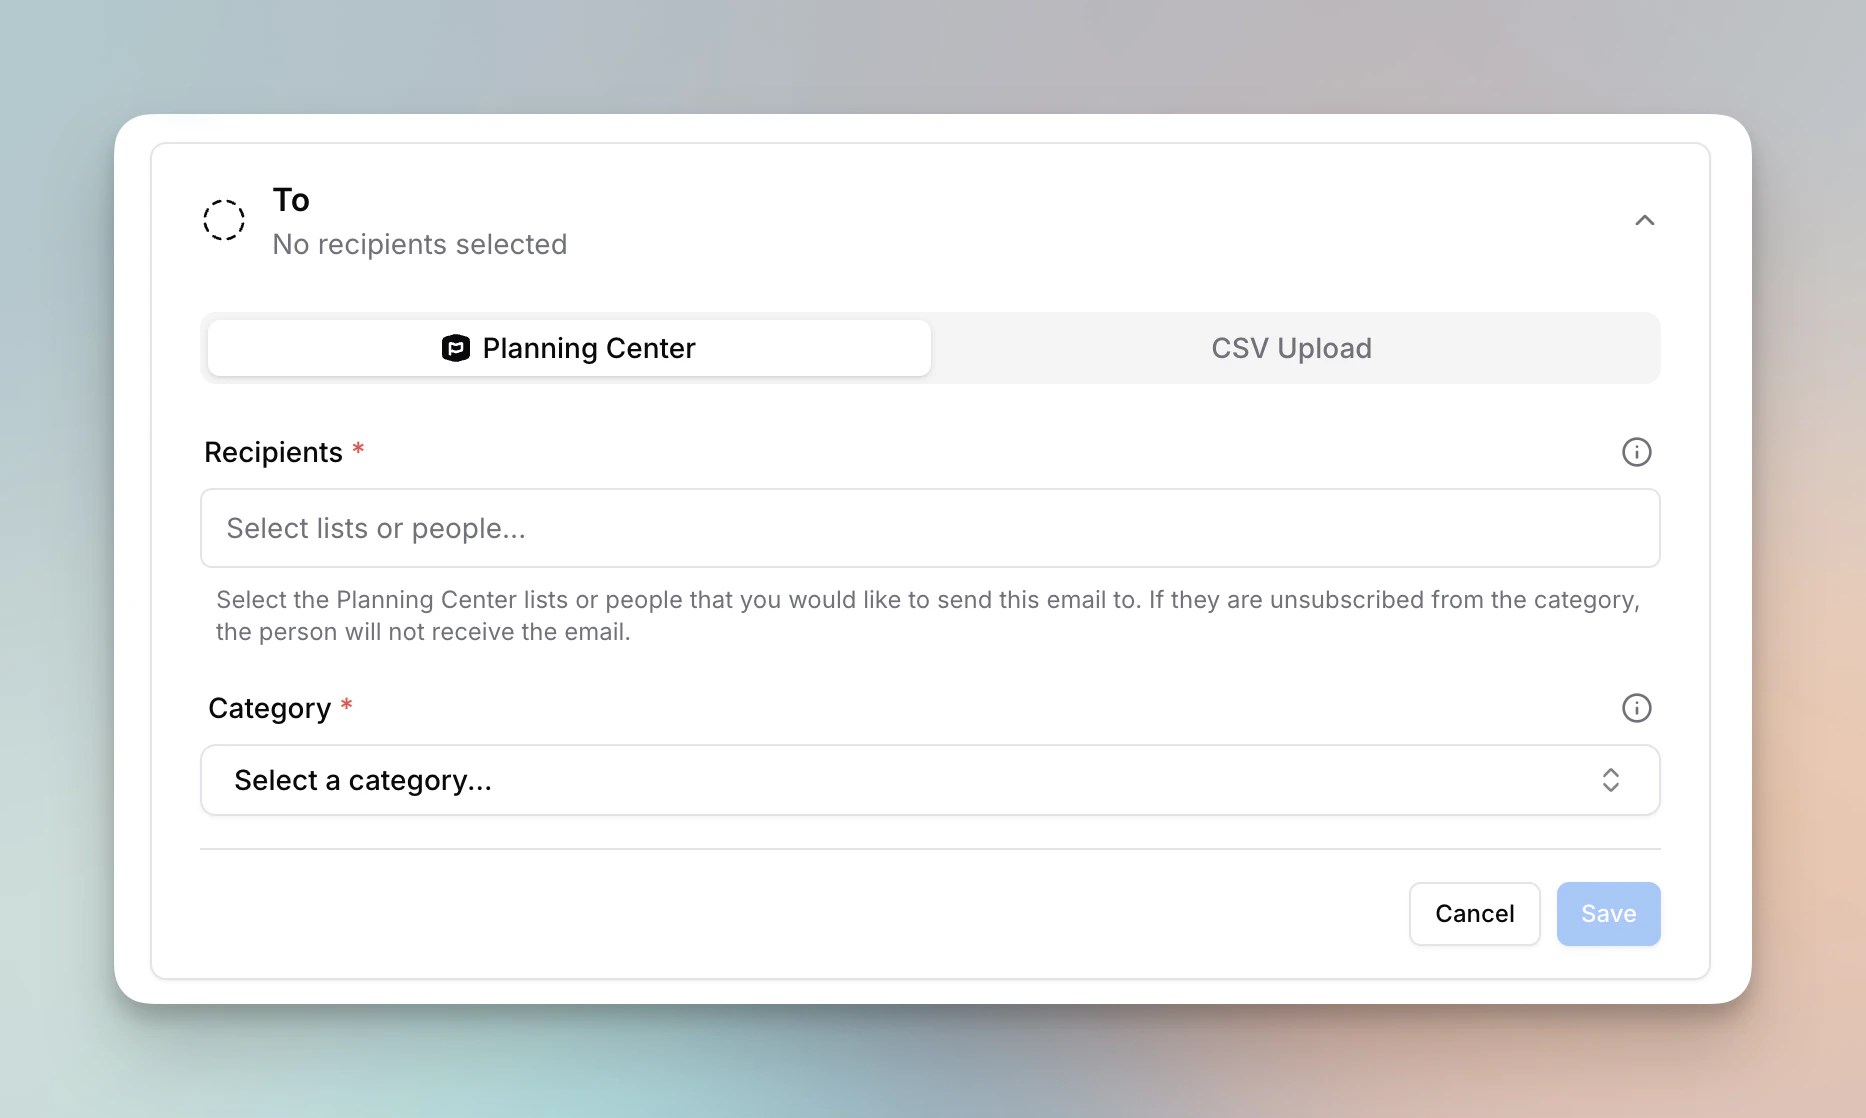
The To field has two tabs:
* **Planning Center** - Select Planning Center lists, individual people, groups, and registrations as recipients. Filter chips at the top of the picker — **All**, **Lists**, **People**, **Registrations**, and **Groups** — let you narrow what you're browsing. Lists load by default, People are search-only, and Groups and Registrations load when you select their chip or appear when you search from **All**.
* **CSV Upload** - Upload a CSV file of email addresses to send to. This is useful when you need to send to a list of people that isn't managed in Planning Center.
The displayed count on each list is the count in Planning Center. Actual recipients may be fewer due to unsubscribes, missing emails, or duplicates.
When you send to a **registration**, the email goes to each registration's **contact — the person who filled out the registration — not the attendees themselves.** A parent who registers their kids receives the email; the kids do not. See [Sending to Groups & Registrations](/emails/sending-to-groups-and-registrations) for details on groups, registrations, the permissions they require, and the Planning Center scopes involved.
You'll also select a **Category** (e.g. General, Students, Kids) which helps recipients manage their email preferences.
You can save the **To** section with just a category or just recipients, so you can set up an email in stages. You'll still need both a category and at least one recipient before the email can be sent.
#### How Filtering and De-Duplication Works
When you send to multiple lists, individual people, or a CSV upload, Flowforth automatically handles filtering and de-duplication so no one receives the email more than once:
1. **People are collected** from all selected lists and any individually added people.
2. **Duplicate people are removed** — if the same person appears on multiple lists, or is on a list and also added individually, they are identified by their Planning Center profile and only included once.
3. **Subscription filters are applied** — people who are unsubscribed from your organization's emails, unsubscribed from the email's category, or have no email address on file are excluded.
4. **No-reply addresses are removed** — email addresses containing "no-reply" or "noreply" are filtered out.
5. **Final email de-duplication** — as a last step, any remaining duplicate email addresses (e.g. two different people sharing the same email) are caught and de-duplicated so only one copy is delivered per address.
### FROM
* **From Email**: The part before the `@` of your sending address
* **From Name**: The sender name shown in the inbox
* **Reply-to Address**: Where replies to this email will go
### SUBJECT
* **Subject**: What appears as the subject line in the inbox
* **Preview Text**: The summary text shown in inboxes (not visible in the email)
### SEND TIME
* **Send Now**: The email will send when you click **Send Now** in the top right and then confirm
* **Schedule**: Pick a date and time at least 10 minutes in the future (time shown in your local timezone)
> The email is **not officially scheduled** until you click **Schedule** and confirm.
***
# Testing Your Email
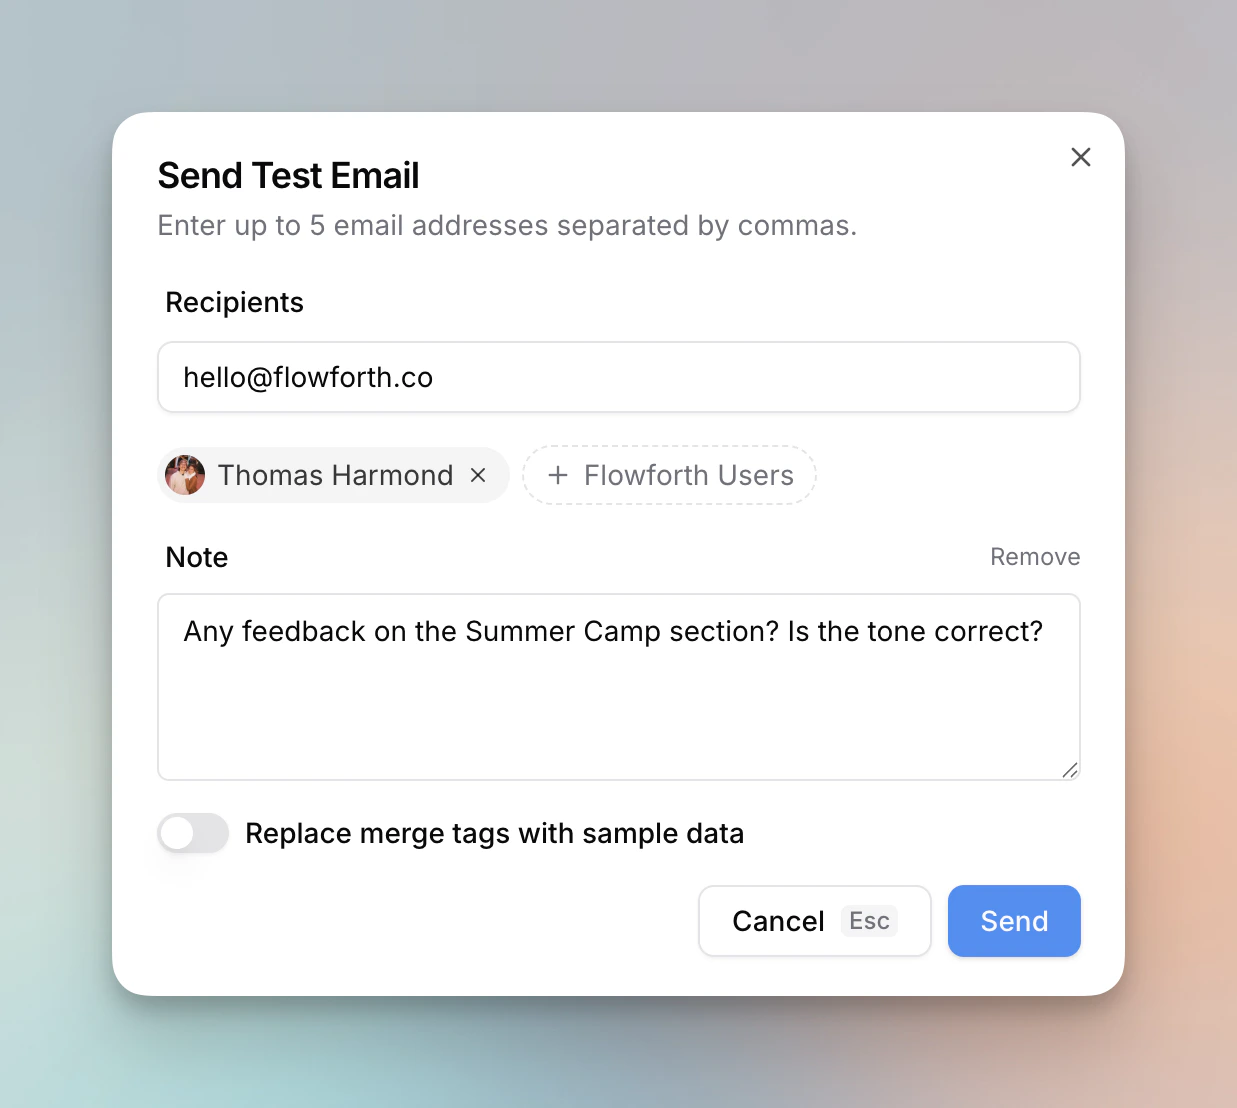
Click **Send Test** in the editor or on the details page to open the test email modal.
* **Recipients** - Enter up to **5 email addresses** separated by commas, or click **+ Flowforth Users** to quickly add team members from your organization
* **Note** - Add an optional note that appears at the top of the test email, useful for asking reviewers for specific feedback
* **Replace merge tags with sample data** - Toggle this on to preview how merge tags will look with real data instead of showing the raw tag names
* **Test emails do not count** against your send limit
***
# Other Notes
* Email appearance may vary slightly across email clients (Gmail, Outlook, Apple Mail, etc.)
* We follow modern HTML email standards and work to minimize rendering differences
* If you notice display issues, let us know at [support@flowforth.co](mailto:support@flowforth.co) and we’ll help resolve it
***
Ready to design and send your first email? Head to [Flowforth Emails](https://flowforth.co/emails) to get started.
 The template picker has three tabs:
1. **Gallery** - Browse a collection of pre-designed templates to get started quickly
2. **Saved Templates** - Apply one of your saved templates
3. **Recently Sent** - Start from the content or style of a recently sent email
You can also click **Start from scratch** at the bottom to begin with a blank email.
***
## Designing Your Email
### Adding and Editing Blocks
* Drag blocks from the left sidebar into the email canvas
* Reorder blocks by dragging them within the canvas or using the **arrow buttons** to the right of the block
* Click a block to edit it in the sidebar (or edit text directly in the block)
* Use the formatting toolbar above the canvas for text formatting on text blocks
### Duplicate or Delete a Block
* Click the block, then use the **duplicate** or **trash** icons to the right of the block or use the same options at the bottom of the sidebar.
***
## Editing the Footer
* Click on the footer or select **Footer** in the sidebar
* Edit the content, social links, and layout
* Click the **refresh icon** to reset to your default footer
* Click the **save icon** to save this version as your new default footer
***
## Editing Email Style
Click on **Styles** in the sidebar to customize general appearance, text defaults, button defaults, divider defaults, image defaults, and more.
For a full guide on all style options, see [Email Styles](/emails/email-styles).
***
## Setting Email Details
Go to the email's detail page by clicking "Save and Exit" if you're in the editor or by clicking on the email in the Emails table.
### TO
The template picker has three tabs:
1. **Gallery** - Browse a collection of pre-designed templates to get started quickly
2. **Saved Templates** - Apply one of your saved templates
3. **Recently Sent** - Start from the content or style of a recently sent email
You can also click **Start from scratch** at the bottom to begin with a blank email.
***
## Designing Your Email
### Adding and Editing Blocks
* Drag blocks from the left sidebar into the email canvas
* Reorder blocks by dragging them within the canvas or using the **arrow buttons** to the right of the block
* Click a block to edit it in the sidebar (or edit text directly in the block)
* Use the formatting toolbar above the canvas for text formatting on text blocks
### Duplicate or Delete a Block
* Click the block, then use the **duplicate** or **trash** icons to the right of the block or use the same options at the bottom of the sidebar.
***
## Editing the Footer
* Click on the footer or select **Footer** in the sidebar
* Edit the content, social links, and layout
* Click the **refresh icon** to reset to your default footer
* Click the **save icon** to save this version as your new default footer
***
## Editing Email Style
Click on **Styles** in the sidebar to customize general appearance, text defaults, button defaults, divider defaults, image defaults, and more.
For a full guide on all style options, see [Email Styles](/emails/email-styles).
***
## Setting Email Details
Go to the email's detail page by clicking "Save and Exit" if you're in the editor or by clicking on the email in the Emails table.
### TO
 The To field has two tabs:
* **Planning Center** - Select Planning Center lists, individual people, groups, and registrations as recipients. Filter chips at the top of the picker — **All**, **Lists**, **People**, **Registrations**, and **Groups** — let you narrow what you're browsing. Lists load by default, People are search-only, and Groups and Registrations load when you select their chip or appear when you search from **All**.
* **CSV Upload** - Upload a CSV file of email addresses to send to. This is useful when you need to send to a list of people that isn't managed in Planning Center.
The To field has two tabs:
* **Planning Center** - Select Planning Center lists, individual people, groups, and registrations as recipients. Filter chips at the top of the picker — **All**, **Lists**, **People**, **Registrations**, and **Groups** — let you narrow what you're browsing. Lists load by default, People are search-only, and Groups and Registrations load when you select their chip or appear when you search from **All**.
* **CSV Upload** - Upload a CSV file of email addresses to send to. This is useful when you need to send to a list of people that isn't managed in Planning Center.
 Click **Send Test** in the editor or on the details page to open the test email modal.
* **Recipients** - Enter up to **5 email addresses** separated by commas, or click **+ Flowforth Users** to quickly add team members from your organization
* **Note** - Add an optional note that appears at the top of the test email, useful for asking reviewers for specific feedback
* **Replace merge tags with sample data** - Toggle this on to preview how merge tags will look with real data instead of showing the raw tag names
* **Test emails do not count** against your send limit
***
# Other Notes
* Email appearance may vary slightly across email clients (Gmail, Outlook, Apple Mail, etc.)
* We follow modern HTML email standards and work to minimize rendering differences
* If you notice display issues, let us know at [support@flowforth.co](mailto:support@flowforth.co) and we’ll help resolve it
***
Ready to design and send your first email? Head to [Flowforth Emails](https://flowforth.co/emails) to get started.
Click **Send Test** in the editor or on the details page to open the test email modal.
* **Recipients** - Enter up to **5 email addresses** separated by commas, or click **+ Flowforth Users** to quickly add team members from your organization
* **Note** - Add an optional note that appears at the top of the test email, useful for asking reviewers for specific feedback
* **Replace merge tags with sample data** - Toggle this on to preview how merge tags will look with real data instead of showing the raw tag names
* **Test emails do not count** against your send limit
***
# Other Notes
* Email appearance may vary slightly across email clients (Gmail, Outlook, Apple Mail, etc.)
* We follow modern HTML email standards and work to minimize rendering differences
* If you notice display issues, let us know at [support@flowforth.co](mailto:support@flowforth.co) and we’ll help resolve it
***
Ready to design and send your first email? Head to [Flowforth Emails](https://flowforth.co/emails) to get started.